Senin, 08 Agustus 2011

Cara Membuat Koneksi Dial Speedy

Buat Koneksi Dial Speedy

SMC

Berikut langkah-langkah untuk membuat koneksi Dial speedy berdasarkan OS yang anda gunakan, selamat mencoba…

Windows XP

1.Click Start
2.Click control Panel
3.Click Network connections
4.Click Create a new connection, Next
5.Pic Connect to the internet, Next
6.Pic Set up my connection mannually, Next
7.Pic Connect using a broadband connection that requires a user name and password, Next
8.Put ISP Name : Speedy, Next
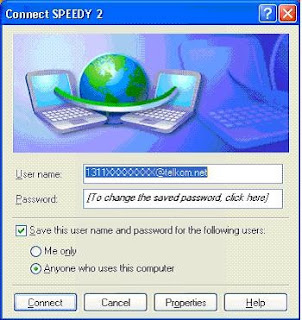
9.put your user name (nmrspeedy@telkom.net) dan password, Next
10.If you wanna create shortcut to desktop, cheklist Add shortcut to this connection to my desktop, Finish.

Windows Vista

1.Click Start
2.Click Connect to
3.Click Set up a connection or network
4.Pic Connect to the internet, Next
5.If you have another Connection, pic Set up a new connection anyway
6.Create a new connection, Next
7.Choose Broadband (PPPoE)
8.Put your user name (nmrspeedy@telkom.net) dan password from Provider
9.And than Click Connect
10.Connected

Mac OS (Tiger)

1.Click System Preferences
2.Click Network
3.Pic Built-in Network
4.Click PPPoE, Cheklist
5.Service Provider: Telkom
6.Account Name: (nmrspeedy@telkom.net)
7.Password: (password From provider)
8.PPPoE Service Name: Speedy
9.Apply Now

Sumber : http://speedytutorial.blog.plasa.com

Senin, 28 Maret 2011

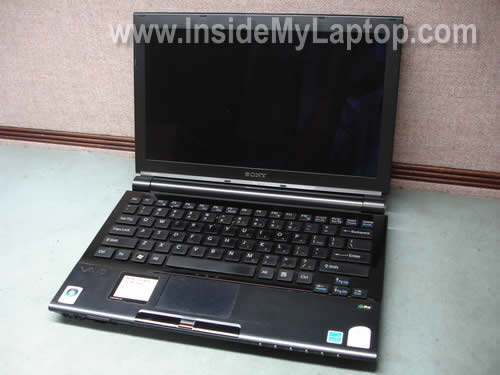
disassemble Sony Vaio PCG-4L3L

In this guide I explain how to disassemble Sony Vaio TZ series laptops in order to remove and replace the hard drive. As an example I took a Sony Vaio TZ130N laptop (Model: PCG-4L3L). In this little laptop the hard drive is buried deep inside the case and we’ll have to disassemble the whole thing apart.

I assume that my guide will work for the entire Sony Vaio TZ line of laptops. If it works for you, please mention the model number in the comments below.

Do not forget to turn off the laptop and remove the battery. Work in static-free environment.


STEP 1.

Remove the memory cover from the bottom.
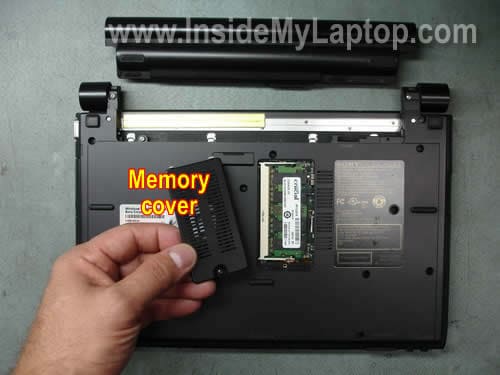
Pull the memory module from the slot.

You don’t have to remove the memory module in order to access and replace the hard drive. I’m doing that just to show where you can find the memory module.
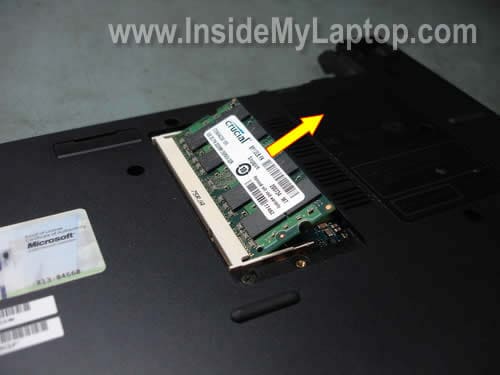
STEP 2.

Remove all marked screws from the bottom of the laptop.
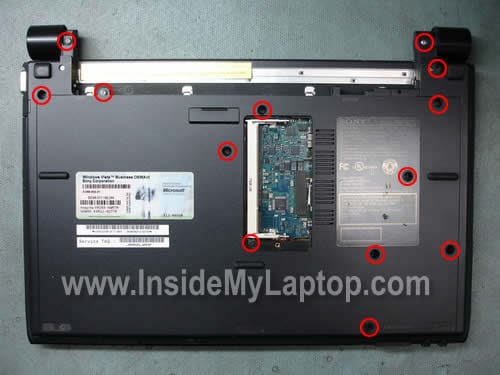
There are three more screws hidden under three rubber seals.
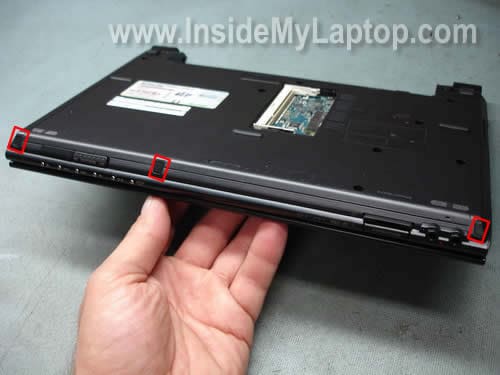
You can remove these rubber seals with a sharp object. Remove all three screws found under the seals.
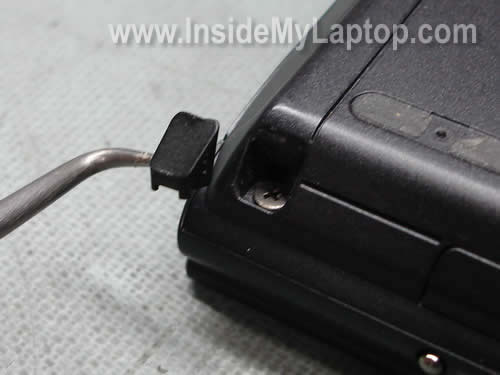
Remove one more screw found under the square rubber seal located close to the hinge.
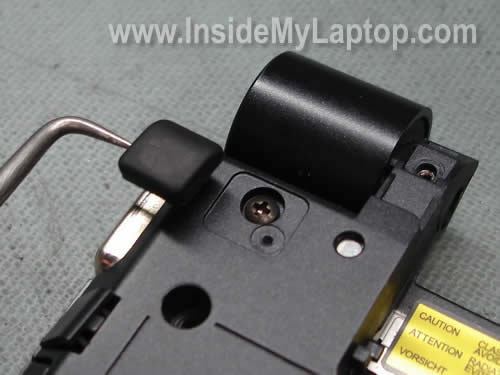
STEP 3.

Very carefully remove the plastic cover from the left hinge. It’s not easy. I spent about 5 minutes trying to figure out how to remove the cover. It has a couple of plastic latches inside and you can remove it using a small flat head screwdriver.
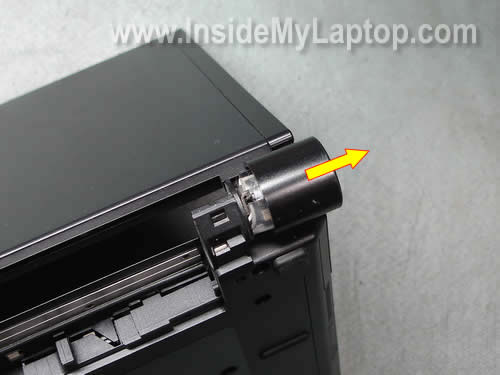
The cover has been removed.

Fortunately, you have to remove only one cover from the left hinge. This cover protects the power jack.
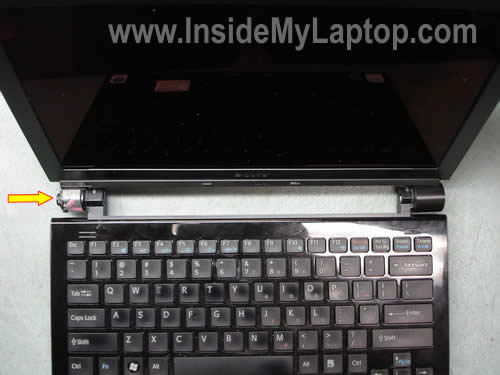
STEP 4.

If you have any SD card or cover inside the slot on the front of the laptop, remove both of them.

Start separating the top cover (keyboard) assembly as it shown on the picture below.
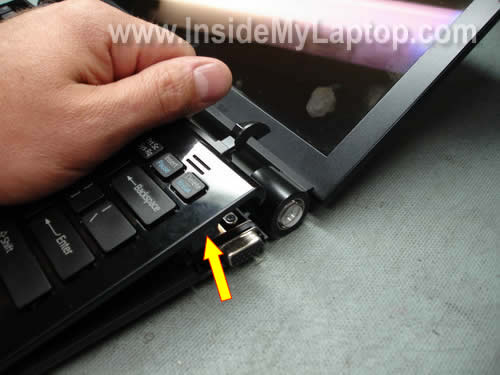
Work with your fingers until the top cover separated from the base.
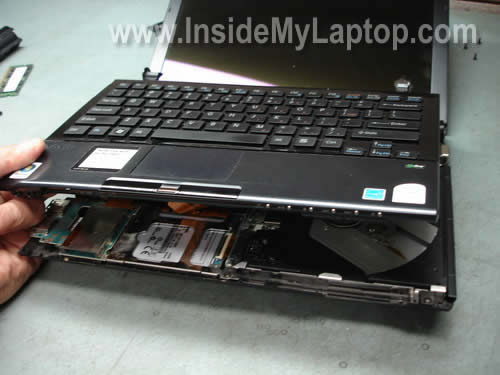
Place the top cover (keyboard) assembly upside down on the palm rest and disconnect the cable from the motherboard.
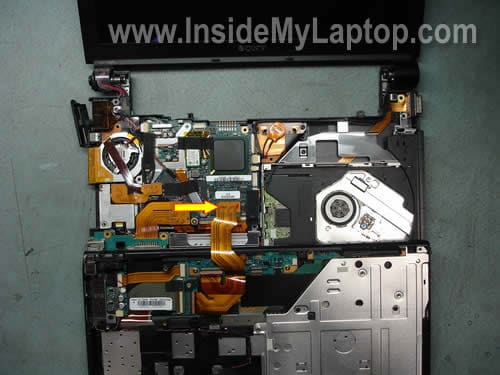
Remove the top cover (keyboard) assembly.
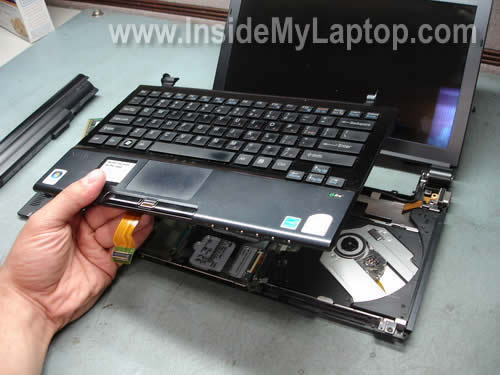
STEP 5.

You cannot access the hard drive until you remove the SD slot/USB board.

Remove two screws securing the board and unplug the cable from the motherboard.
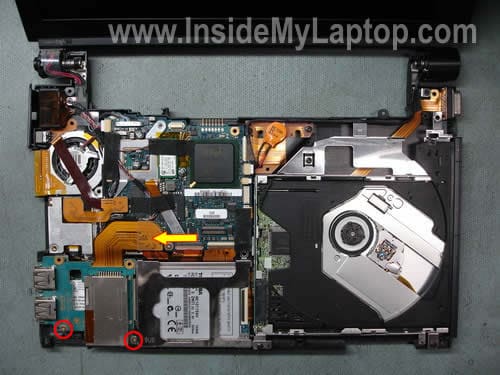
Lift up and remove the SD slot/USB board.
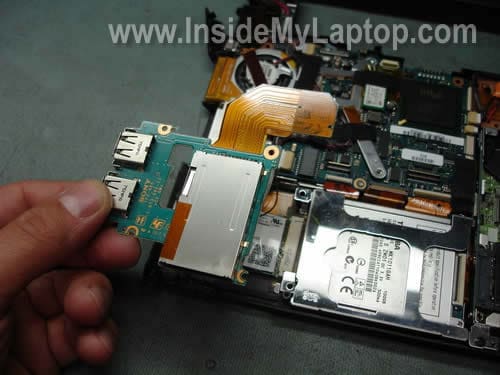
STEP 6.

The hard drive is mounted under the metal bracket. Remove one screw securing the hard drive bracket.

Remove the hard drive bracket.
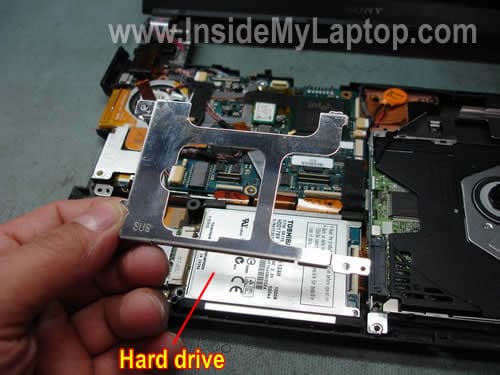
Lift up the hard drive and disconnect the hard drive cable.
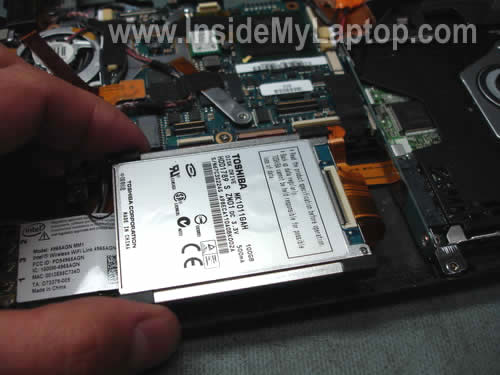
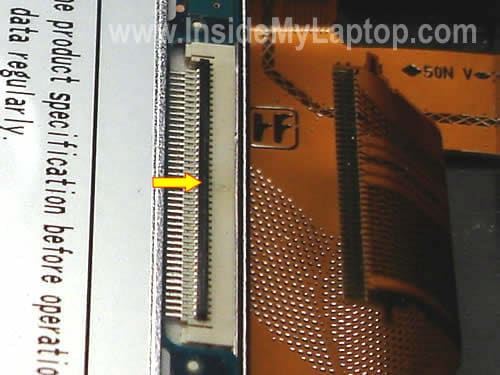
In order to release the cable you’ll have to unlock the connector first. Very carefully lift up the black piece on the connector. Pull the cable from the connector.
The hard drive has been removed. If you are replacing the hard drive, you’ll have to transfer four rubber corners to a new drive.
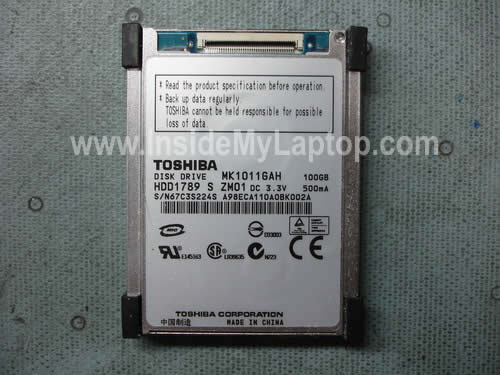
My Sony Vaio TZ130N laptop had a Toshiba 1.8″ 100GB hard drive (MK1011GAH) installed. It’s same type of hard drives found in iPods. These 1.8″ hard drives are not cheap but you can find them relatively inexpensive here.
Rabu, 23 Maret 2011

Cara Mudah Mengontrol Komputer Lain Dengan Radmin 3.3


Kemarin atau lebih tepatnya dua hari yang lalu ada salah satu teman saya yang bertanya seperti ini kepada saya “gimana cara mengontrol atau mengendalikan komputer orang lain tanpa harus melakukan hacking.??

Sebenarnya untuk sekedar melihat-lihat apa saja yang dikerjakan oleh orang lain di komputernya atau bahkan kamu yang selalu kurang puas dengan satu komputer saja dan ingin menggunakan komputer lain tanpa harus berjalan berpindah tempat duduk ..:: males baget ya ::.. itu cukup mudah. Hanya dengan menggunakan software satu ini Radmin 3.3 kita dapat chatting tanpa koneksi internet, melihat aktifitas komputer lain, masuk ke CMD, atau full control (menggunakan komputer secara penuh).

Dan hingga saat ini versi Radmin sendiri baru mencapai 3.3. Untuk download Radmin Server 3.3, Radmin Viewer 3.3 beserta pacthnya silahkan gunakan link dibawah ini

Update 02 April 2010 ( Radmin 3.4 )
Download Radmin Server 3.4
Download Radmin Viewer 3.4
Download Radmin Server & Viewer 3.4
Download keymaker Radmin Server 3.4 ( 100% valid )

tambahan:

Jika ingin mencoba program lain selain radmin silahkan gunakan RVNC

Download RVNC

Untuk installasi, pertama kita install radmin server 3.3 pada komputer yang akan kita remote. Kurang lebih tempilannya seperti gambar dibawah ini

Klik next saja lalu klik lagi hingga proses installasi selesai.

Setelah installasi selesai maka sekarang lakukan setting yaitu dengan klik setting.


Klik button Permissions, lalu kita pilih Radmin Security lalu klik button Permissions lagi. Masukan user dan passwordnya (user dan password akan digunakan saat akan mengontrol PC tersebut).

Selesai melakukan setting maka jalankan patchnya agar tidak ada pembatasan waktu pemakaian. Selesai Patching, kini kita kembali pada komputer kita. Dan kini install radmin viewer 3.3 pada komputer kita.

Selesai intallasi, sekarang coba kita remote komputer yang tadi kita install radmin server.. Hmm berhasil bukan..?? jadi untuk meremote komputer lain gak perlu susah-sah harus dengan hack ya walaupun kita harus install software di komputer target.. Bisanya radmin akan dianggap spyware atau sejenisnya oleh antivirus atau firewall jadi agar program dapat berjalan lancar saya sarankan agar firewallnya dinonaktifkan saja.

Masih kurang ngerti atau memang gak ngerti..??? dateng aja deh ke websitenya di www.radmin.comSemoga membantu meringankan pekerjaan anda.. by…

Hati2 Radmin Software pengintai yang handal

radmin adalah software aplikasi keamanan yang dapat meremot dan mengontrol clien dari server, dapat digunkan ketika anda berada di dalam sebuah jaringan komputer dan dapat mengontrol jaringan komputer tanpa harus menyentuh komputer client.

Radmin umumnya di instal di warnet untuk mempermudah kerja operator dalam aktivitasnya seperti meremot client dari komputer operator agar dapat di restart atau di shout down tanpa datang ke komputer client/user.

Sudah menjadi rahasia umum bahwa Operator warnet mempunyai hak akses penuh terhadap komputer yang dipakai user. maka kalau kita tidak hati2 bisa2 dokumen yang kita browsing dari e mail atau private massage lewat Y!M bisa dibaca juga oleh OP warnet maka kenyamanan kita untuk browsing di internet biasa terganggu.

Contoh : Op melihat aktivitas yang dilakukan user spy

CARa menggunakan RAdmin

begini cara menggunakan redmin :

1. instal radmin pada komputer yang akan di jadikan server

2. setelah terinstal kemudian instal service

3. copy r_server ke client yang ingin diremote kemudian paste ke start up

4. copy Adm.dll.dll ke client yang ingin diremote kemudian paste di c: windows

5. kemudian buka di server aplikasi radmin 2., start radmin viewer. Kemudian klik menu connetion pilih new

6. isikan nama untuk new entri misalnya komputer 1 terus isikan juga Ip address or DNS name misalnya 192.168.0.1 kemudian klik OK

7. kemudian klik gambar komputer pilih full control atau cuma view

Selesai deh anda dapat meremote seseorang sekarang :)

Cara menyetop Radmin :

radmin sebenar nya adalah software spionase he3 yang mana mengurangi kita untuk bersurfing di Internet, karena Op sebuah warnet dapat melihat kegiatan kita melalui komputer Op yang sebelumnya komputer client telah dipasangi r_server (radmin)

Bayangkan saja jika kita sedang membaca sebuah dokumen penting dan sang OP ikut membaca wah 8-> jadi berabe khan he ;) ).

Untuk menyetop Radmin ada beberapa cara diantaranya :

cara 1 :

1. Jalankan MS DOS Prompt
(start>>Programs>>Accessories>>Command Prompt/CMD atau dengan
menjalankan program Run > ketik cmd (enter)2. Jalankan/ketikkan r_server /setup
(enter) 3. Setelah muncul properties setting for administrator server,
pilih set password, lalu hapus password/tanda ||||, lalu masukkan
sembarang password..?

cara 2 :

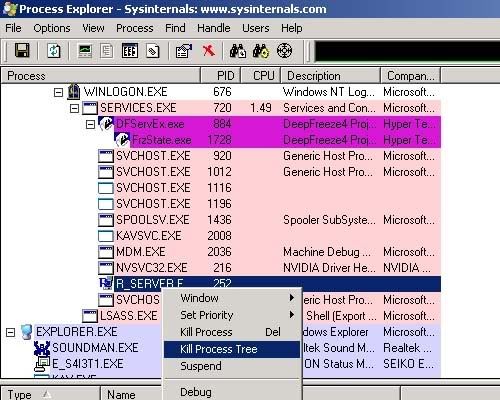
Instal process XP, anda dapat mendownload nya di http://www.microsoft.com/technet/sysinternals/Utilities/ProcessExplorer.mspx cuma 1.5 Mb

setelah ter instal cari tulisan r_server layar radmin

kemudian klik kill process tree, kemudian klik OK.

NB : gambar yang saya tampilkana adalah process XP versi 9.2

Sekarang anda aman untuk browsing di warnet :) selamat mencoba

Kamis, 17 Maret 2011

Cara Recovery BIOS HP Pavilion DV4, CQ40 dan C700

Kemarin Saya baru saja menggarap Compaq CQ40-717TU yang MATI dengan lampu led power dan wifi tetap nyala. Sebelumnya Saya juga sudah pernah menggarap Compaq CQ40 - 653TU yang MATI juga dengan kerusakan yang sama. Saya sudah mencoba dan berhasil.

Matinya laptop CQ40 ini disebabkan oleh downgrade BIOS yang mengalami kegagalan sehingga terjadi kerusakan di BIOS laptopnya. Dan akibatnya Laptop Mati tidak keluar tampilan dengan led power dan wifi tetap menyala. Jangan Panik dulu, jika Sobat mengalami hal ini, tapi bagaimanapun Saya dulu juga panik bagaimana ya…..? Ok silahkan dibaca saja ya ...........

Cara Recovery BIOS HP Pavilion DV4, CQ40 dan C700 :
Download BIOS di situs resminya. PENTING : BIOS harus sama persis, misalnya CQ40-717TU, berarti anda harus download BIOS CQ40-717TU. Dan CQ40-717TU tidak sama dengan CQ40-717TX. Kalo untuk laptop CQ40 anda dapat mendownloadnya disini , Biasanya judul filenya "WinFlash for HP Notebook System BIOS - Microsoft Windows-Based"
Siapkan Flasdisk kosong, kalo kemarin saya menggunakan flashdisk 2Gb Kingston. Ingat kosngkan dulu flashdisk anda agar prosesnya nanti berjalan lancar.
Extract file BIOS hasil download yang berupa .exe dengan menggunakan program WinRar atau 7ZIP.
Cari file yang berekstensi .FD misalnya 30F7F04.FD, pilih salah satu (biasanya ada 4 file dengan ekstensi .FD), misalnya saya memilih 30F7F04.FD. Kemudian sisakan 4 huruf pertama yaitu 30F7 kemudian tambahi dengan ekstensi . BIN sehingga menjadi 30F7.BIN.
Jadi file 30F7F04.FD menjadi 30F7.BIN, kemudian simpan file 30F7.BIN itu ke flashdisk.
Lepaskan CHARGER dan BATERAI dari laptop. Ingat baterai harus di lepas.
Colokkan flashdisk yg ada file xxxx.BIN
Tekan dan tahan tombol keyboard Windows dan B
Pasang Charger, tombol Windows dan B jangan di lepas dulu.
Nyalakan laptop dengan menekan tombol power Laptop
Tahan tombol windows dan B sampai terdengar bunyi “ beep ”, kemudian lepaskan kedua tombol itu. Laptop secara otomatis mencari BIOS asli ini ditandai dengan led flashdisk yg kedip2x.
Bunyi beep akan terdengar berulang tiap 2 detik, biarkan saja, laptop akan mati sendiri secara otomatis setelah selesai merestore / merecovery BIOS.
Selesai. Untuk mencobanya nyalakan laptop seperti biasanya dengan hanya menekan tombol powernya.
Jika anda mengalami kegagalan, coba lagi dan coba dengan flashdisk yang lain, ingat…… flashdisk harus kosong untuk memudahkan laptop mencari file BIOS yang akan di restore atau direcovery.

Selamat mencoba …......

Cara Self Test Printer Epson


undefinedJika Sobat sering mendapatkan service an printer Epson dan Sobat sering kesulitan untuk test print karena harus pasang driver segala di komputer, mungkin Sobat perlu mencoba trik ini.

Berikut ini adalah cara print test langsung dari printer Epson tanpa lewat komputer.


Cara Self Test Printer Epson :

Printer Epson type :
C series :
C41, C42, C43, C45, C58, C61, C62, C63, C65, C67, C79, C85, C86, C87, etc.

R series :
R210, R230, R270, etc.

  • Siapkan kertas pada printer unit.
  • Tekan dan tahan tombol paper/resume lalu tekan tombol power

Printer Epson type :
CX Series : CX 3500, CX 3600, CX3700, CX 5100, CX CX 4900 , CX 5900, etc

  • Siapkan kertas pada printer unit.
  • Tekan dan tahan tombol power lalu tekan tombol ink/tinta hingga lampu power indikator berkedip 1x lalu lepas kedua tombol tersebut.

Selamat Mencoba ...................

Menjebol/Reset Password BIOS Komputer


Password BIOS (Basic Input Output System) memang sangat berguna untuk melindungi komputer Sobat supaya tidak ada orang lain yang dapat mengganti konfigurasi komputer Sobat. Tapi password tersebut bisa menjadi malapetaka jika Sobat lupa. Nah, jika Sobat lupa password BIOS Sobat, di bawah ini daftar default password yang aslinya memang disediakan oleh pembuatnya untuk mengantisipasi kejadian password yang terlupakan. Yang perlu Sobat lakukan adalah mencoba satu per satu password tersebut sampai Sobat menemukannya.Silahakan di simak ...

Download E-Booknya disini
  • AWARD BIOS
01322222, 589589, 589721, 595595, 598598, AWARD SW, AWARD_SW, Award SW, AWARD PW, _award, awkward, J64, j256, j262, j332, j322, HLT, SER, SKY_FOX, aLLy, aLLY, Condo, CONCAT, TTPTHA, aPAf, HLT, KDD, ZBAAACA, ZAAADA, ZJAAADC, djonet, %øåñòü ïpîáåëîâ%, %äåâÿòü ïpîáåëîâ%
  • AMI BIOS
AMI, A.M.I., AMI SW, AMI_SW, BIOS, PASSWORD, HEWITT RAND, Oder
  • PHOENIX
BIOS, CMOS, phoenix, PHOENIX
Password lainnya yang bisa Anda cob
LKWPETER, lkwpeter, BIOSTAR, biostar, BIOSSTAR, biosstar, ALFAROME, Syxz, Wodj

Semoga Bermanfaat............